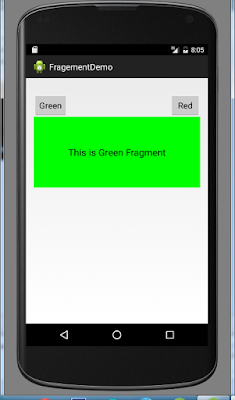
For creating a fragment we only use two things:-
- Fragment class
- Fragment xml layout
In the below discussed example we need to show different fragments on button click event. So, we will be creating two layout files and two different classes.
Here goes the code for first Fragment:
FirstFragment.java
package com.example.fragementdemo;
import android.app.Fragment;
import android.os.Bundle;
import android.view.LayoutInflater;
import android.view.View;
import android.view.ViewGroup;
public class FirstFragment extends Fragment {
@Override
public View onCreateView(LayoutInflater inflater, ViewGroup container,
Bundle savedInstanceState) {
// TODO Auto-generated method stub
View view = inflater.inflate(R.layout.first_fragment_layout, container, false);
return view;
}
}
and Layout for this fragment is first_fragment_layout.xml
first_fragment_layout.xml
<?xml version="1.0" encoding="utf-8"?>
<RelativeLayout xmlns:android="http://schemas.android.com/apk/res/android"
android:id="@+id/first_frag_layout"
android:layout_width="match_parent"
android:layout_height="150dp"
android:orientation="vertical"
android:background="#00FF00" >
<TextView
android:id="@+id/text_frag1"
android:layout_width="wrap_content"
android:layout_height="wrap_content"
android:layout_centerHorizontal="true"
android:layout_centerVertical="true"
android:textSize="20sp"
android:textColor="#000000"
android:text="This is Green Fragment"
/>
</RelativeLayout>
similarly we make another class for second fragment
Second_Fragment.java
package com.example.fragementdemo;
import android.app.Fragment;
import android.os.Bundle;
import android.view.LayoutInflater;
import android.view.View;
import android.view.ViewGroup;
public class Second_Fragment extends Fragment {
@Override
public View onCreateView(LayoutInflater inflater, ViewGroup container,
Bundle savedInstanceState) {
// TODO Auto-generated method stub
View view = inflater.inflate(R.layout.second_fragment_layout, container,false);
return view;
}
}
second_fragment_layout.xml
<?xml version="1.0" encoding="utf-8" ?><RelativeLayout xmlns:android="http://schemas.android.com/apk/res/android"
android:id="@+id/second_frag_layout"
android:layout_width="match_parent"
android:layout_height="150dp"
android:orientation="vertical"
android:background="#FF0000"
>
<TextView
android:id="@+id/text_frag1"
android:layout_width="wrap_content"
android:layout_height="wrap_content"
android:layout_centerHorizontal="true"
android:layout_centerVertical="true"
android:text="This is Red Fragment"
android:textColor="#000000"
android:textSize="20sp" />
</RelativeLayout>
once both the activities get created, now we could use them in Mainactivity class, below is the code for MainActivity
MainAcitivity.java
package com.example.fragementdemo;
import android.app.Activity;
import android.app.FragmentManager;
import android.app.FragmentTransaction;
import android.os.Bundle;
import android.view.View;
import android.view.View.OnClickListener;
import android.widget.Button;
public class MainActivity extends Activity {
Button green_btn, red_btn;
@Override
protected void onCreate(Bundle savedInstanceState) {
super.onCreate(savedInstanceState);
setContentView(R.layout.activity_main);
green_btn = (Button) findViewById(R.id.btn_show_frag);
red_btn = (Button)findViewById(R.id.btn_frag2);
green_btn.setOnClickListener(new OnClickListener() {
@Override
public void onClick(View arg0) {
// TODO Auto-generated method stub
FragmentManager fm = getFragmentManager();
FragmentTransaction ft = fm.beginTransaction();
FirstFragment first = new FirstFragment();
ft.add(R.id.first_frag_layout, first);//adding fragment to parent layout
ft.addToBackStack("first");//removing on back press
ft.commit();
}
});
red_btn.setOnClickListener(new OnClickListener() {
@Override
public void onClick(View arg0) {
// TODO Auto-generated method stub
FragmentManager fm1 = getFragmentManager();
FragmentTransaction ft1 = fm1.beginTransaction();
Second_Fragment second = new Second_Fragment();
ft1.add(R.id.second_frag_layout, second);
ft1.addToBackStack("second");//removing on back press
ft1.commit();
}
});
}
}
now check the xml file for MainActivity, in this xml file the id for fragment layouts will be same as the id created in first and second fragment layouts.
activity_main.xml
<RelativeLayout xmlns:android="http://schemas.android.com/apk/res/android"
xmlns:tools="http://schemas.android.com/tools"
android:layout_width="match_parent"
android:layout_height="match_parent"
android:paddingBottom="@dimen/activity_vertical_margin"
android:paddingLeft="@dimen/activity_horizontal_margin"
android:paddingRight="@dimen/activity_horizontal_margin"
android:paddingTop="@dimen/activity_vertical_margin"
tools:context=".MainActivity" >
<RelativeLayout
android:id="@+id/first_frag_layout"
android:layout_width="match_parent"
android:layout_height="150dp"
android:layout_below="@+id/btn_show_frag" >
</RelativeLayout>
<Button
android:id="@+id/btn_show_frag"
android:layout_width="wrap_content"
android:layout_height="wrap_content"
android:layout_alignParentLeft="true"
android:layout_alignParentTop="true"
android:layout_marginTop="18dp"
android:text="Green" />
<Button
android:id="@+id/btn_frag2"
android:layout_width="wrap_content"
android:layout_height="wrap_content"
android:layout_above="@+id/first_frag_layout"
android:layout_alignRight="@+id/first_frag_layout"
android:text="Red" />
<RelativeLayout
android:id="@+id/first_frag_layout"
android:layout_width="match_parent"
android:layout_marginTop="20dp"
android:layout_height="150dp"
android:layout_below="@+id/btn_show_frag" >
</RelativeLayout>
<RelativeLayout
android:id="@+id/second_frag_layout"
android:layout_width="match_parent"
android:layout_marginTop="20dp"
android:layout_height="150dp"
android:layout_below="@+id/first_frag_layout">
</RelativeLayout>
</RelativeLayout>
There is a single line code written in MainActivity.java, i.e.
ft.addToBackStack("first");
this will disappear the fragment on back press button click.
That's it. coding is complete, now time to check the Output.
Output:


Comments
Post a Comment